Activating the Furnace Control Display Window
Once you create a drawing window, you can easily activate it. When you activate a drawing window, control tools automatically begin reflecting the current states of the channels to which they are connected. As your system updates the Vsystem database, the active control display window accurately reflects the changes.
If you defined the control tools as controllable when you created them, you can control the database--and therefore channel values--from the active control display window by pressing a mouse button, dragging the mouse, or entering values with the keyboard. If you did not define the control tools as controllable, however, they can only reflect database states; you cannot use them to change the data.
To activate a drawing window
-
In the Vdraw Toolbox, click the Activate button.

-or-
-
On the Window menu in the menu bar, select Activate.
-or-
-
Right-click anywhere in the control display window and select Activate Window from the pop-up menu.
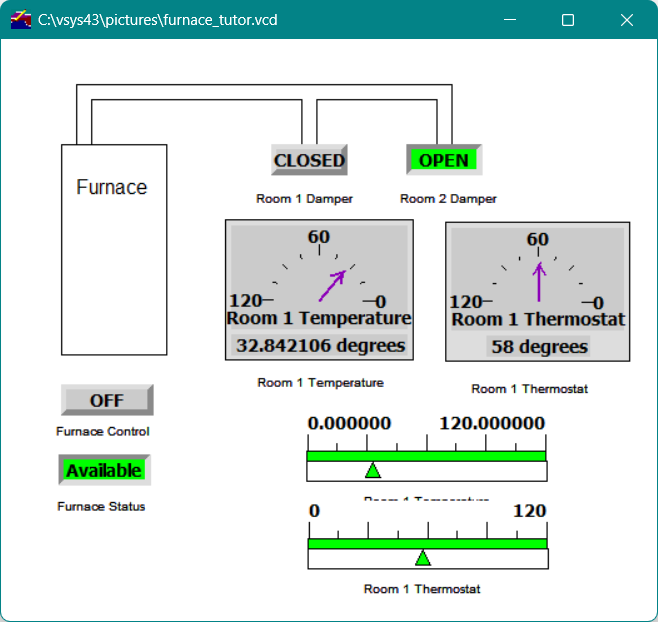
Figure23 - Active drawing window
Operating the Bar Control Tools
When a Bar control tool is activated, it reflects the limits assigned with the Limits option, in this case ranging between the specified limits of 0 and 120. Because you selected Status Color as the color scheme option, the Bar control tool uses one color to reflect the current status of the channel.
Because you made the triangle of the Bar control tool user-controllable, you can change the value in the database by moving the triangle.
To move the triangle
-
Place the mouse pointer on the control triangle, press the left mouse button, and drag the mouse right to increase the channel value or left to decrease the channel value
You can also use the other mouse buttons to move the control triangle. Each mouse button controls a different increment/decrement rate of a value:
-
Dragging with the left mouse button pressed changes the value at the default movement resolution.
-
Dragging with the middle mouse button pressed changes the value by one-tenth of the movement resolution.
-
Dragging with the right mouse button pressed changes the value by one-hundredth of the movement resolution.
Figure 23 shows a view of the Room 1 Temperature and Thermostat Bar control tools and their Meter control tools in the furnace control display window. Notice that each Bar control tool and its corresponding Meter control tool are set to the same value; this is because you assigned each set of these control tools to the same channel when you created them. When you change the value on one of these control tools, the value on the other automatically updates.
Operating Button Control Tools
The text on each button reflects the current state of the channel assigned to that Button control tool. Because you set Button Type to Toggle in the Button Control Tool Properties dialog, when you click on the Button control tools, the channels change to their opposite binary states.
Operating Meter Control Tools
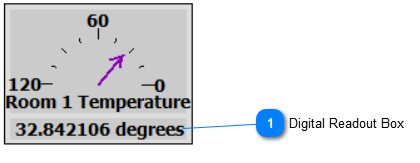
When activated, the Meter control tools display the values that were assigned with the Limits option. The labels Room 1 Temperature and Room 1 Thermostat also display. Because you selected Display Digital Readout in the Meter Control Tool Properties dialog, the channel values display along with the units you assigned to them when you created the Vsystem database.
Because you selected Controllable for the needle on each Meter control tool, you can control the value of the channel assigned to a Meter control tool by moving its needle or by changing the value directly in the digital readout box.
To control a Meter control tool by moving its needle
-
Place the mouse pointer on the needle, press the mouse button, and drag the needle to the new value.
The digital readout box reflects the value of the location of the needle on the Meter control tool. The new value is assigned to the channel as soon as you release the mouse button.
Note When you drag the mouse pointer with the middle or right mouse button pressed, the needle moves in one-degree increments or decrements. If the Meter control tool is attached to an integer channel, and if the meter range is small, the needle may not operate as expected when the middle or right mouse button is used, because the needle can only increment or decrement in whole-number units.
|
You can also change the channel value directly from the digital readout box.
To change a channel value from the digital readout box
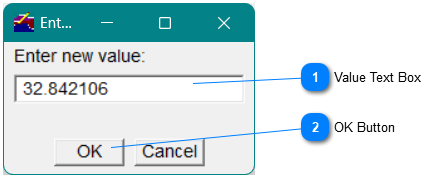
If you do not enter a new value, the value present when the digital readout box was accessed remains the value of the control tool.
Showing Control Tools
When the furnace control display window is open, you can view the number of control tools in the control display window. This can be important, because many control display windows include objects that may appear to be control tools, but are not.
To view the control tools in a control display window
-
Right-click in the window anywhere there is no tool; on the pop-up menu that appears, select Show control tools.
-or-
-
On the Tools menu in the menu bar, select Show Control Tools.
A window appears showing the types of control tools and their number at the bottom, as shown below.
Figure24 - Show Control Tools for Inactive Display

Figure25 - Show Control Tools for Active Display
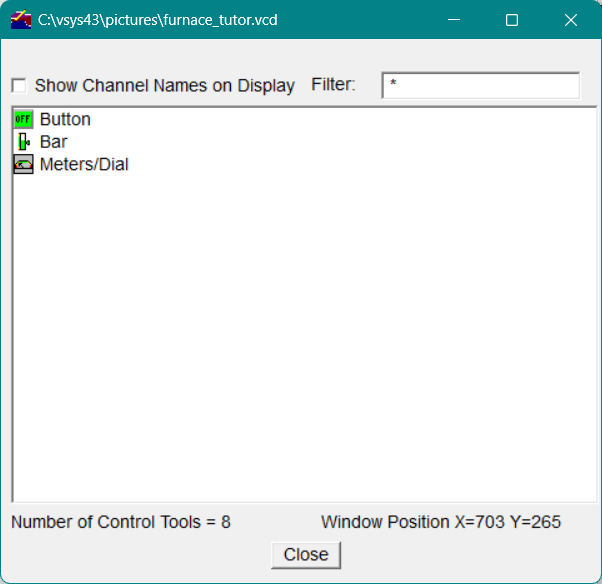
You can double-click on a control tool type in either list box (active or inactive) to view all of the control tools for that type. Subsequent double-clicking on tree items expands each control tool to show the channel(s) it is connected to.